8 Color in your images

Using colors effectively in your photographs

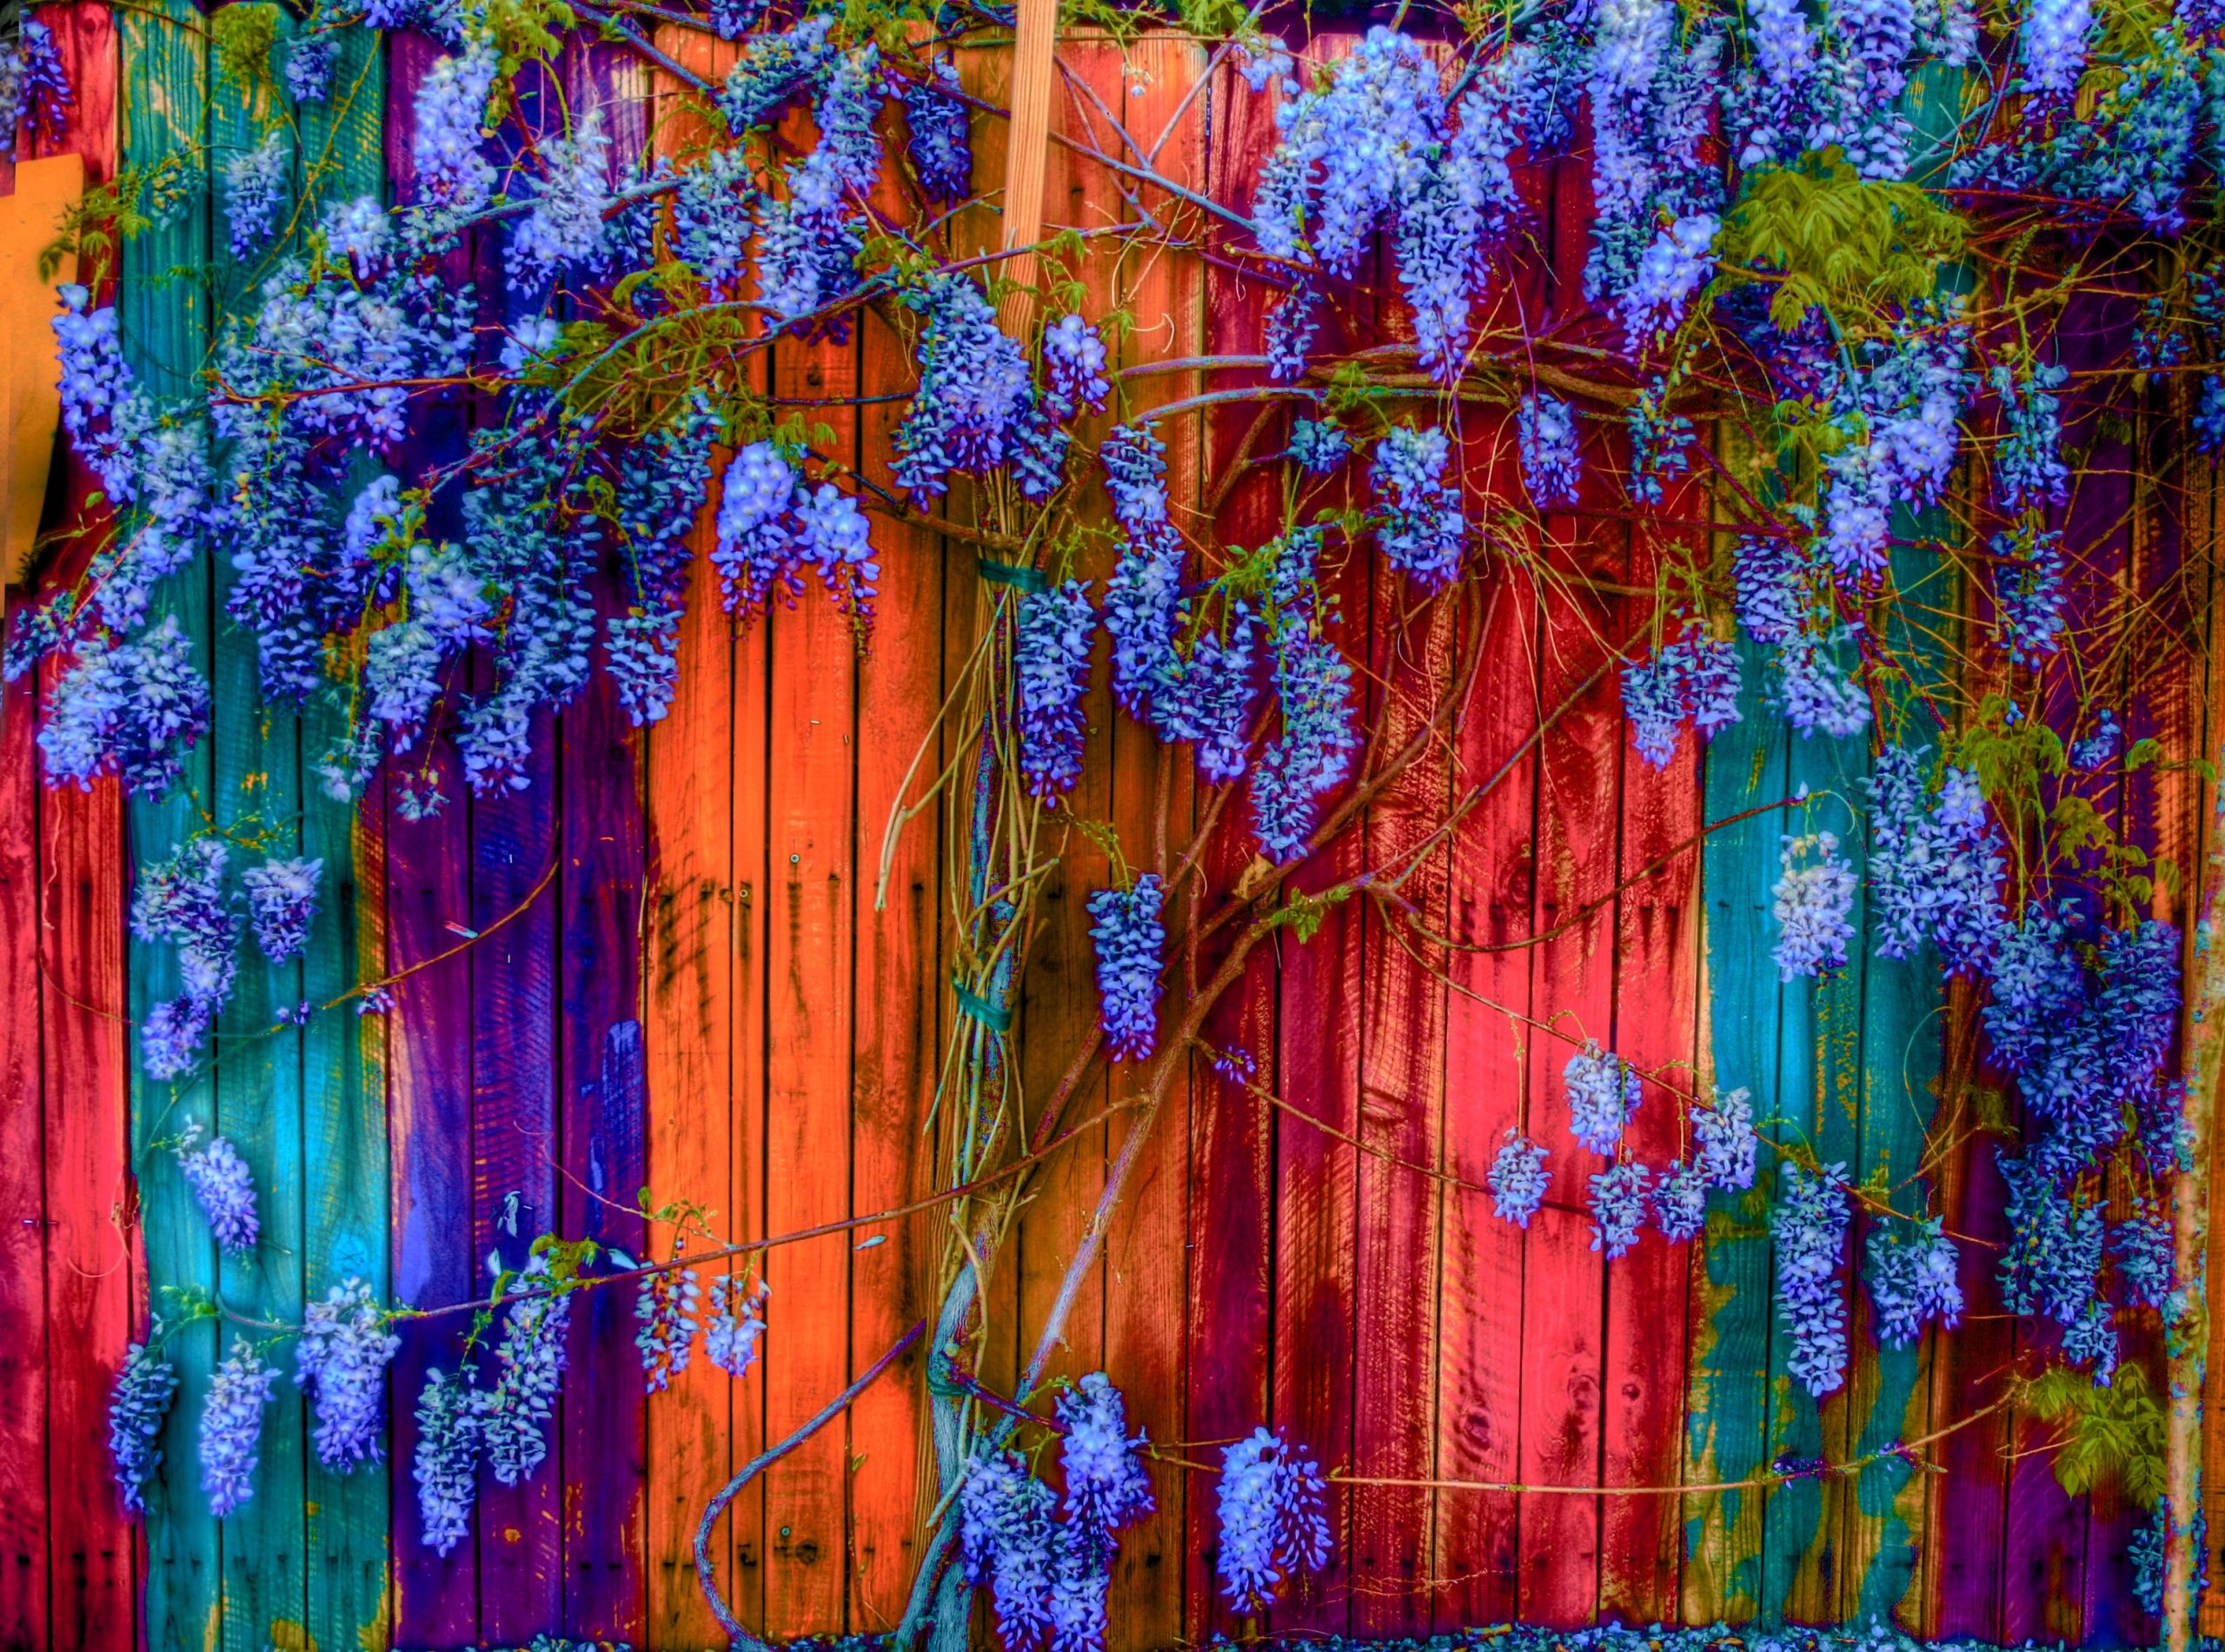
The vibrant colors of a wisteria vine contrast beautifully against the brightly painted wooden fence. This image was created using a High Dynamic Range (HDR) process, with further color enhancement in Photoshop to emphasize the vivid hues as the focal point of the image. Photo by Eric Demattos CC BY-NC-SA (Attribution Non Commercial ShareAlike)

Understanding Color Theory

Color theory is a fundamental aspect of photography that involves the use of colors to create aesthetically pleasing and impactful images. Understanding how colors interact and how they can be combined is essential for creating visually engaging photographs. In this chapter, we will explore three main color relationships: analogous colors, complementary colors, and monochromatic colors. By mastering these concepts, you will enhance your ability to use color effectively in your photography.
Color Relationships

Analogous Colors

You may have noticed my fondness for capturing old, forgotten buildings. In this image, the orange sunset created a beautiful analogous color relationship. If you map the colors on a color wheel, you’ll see how the yellows, oranges, dark oranges, and browns are all adjacent, forming this harmonious effect. Gray, white, and black are neutral colors without a hue, so they don’t sit on the color wheel and don’t affect the analogous color scheme, allowing the warm tones to stand out. (this image was created using the HDR process) Photo by Eric Demattos CC BY-NC-SA (Attribution Non Commercial ShareAlike)

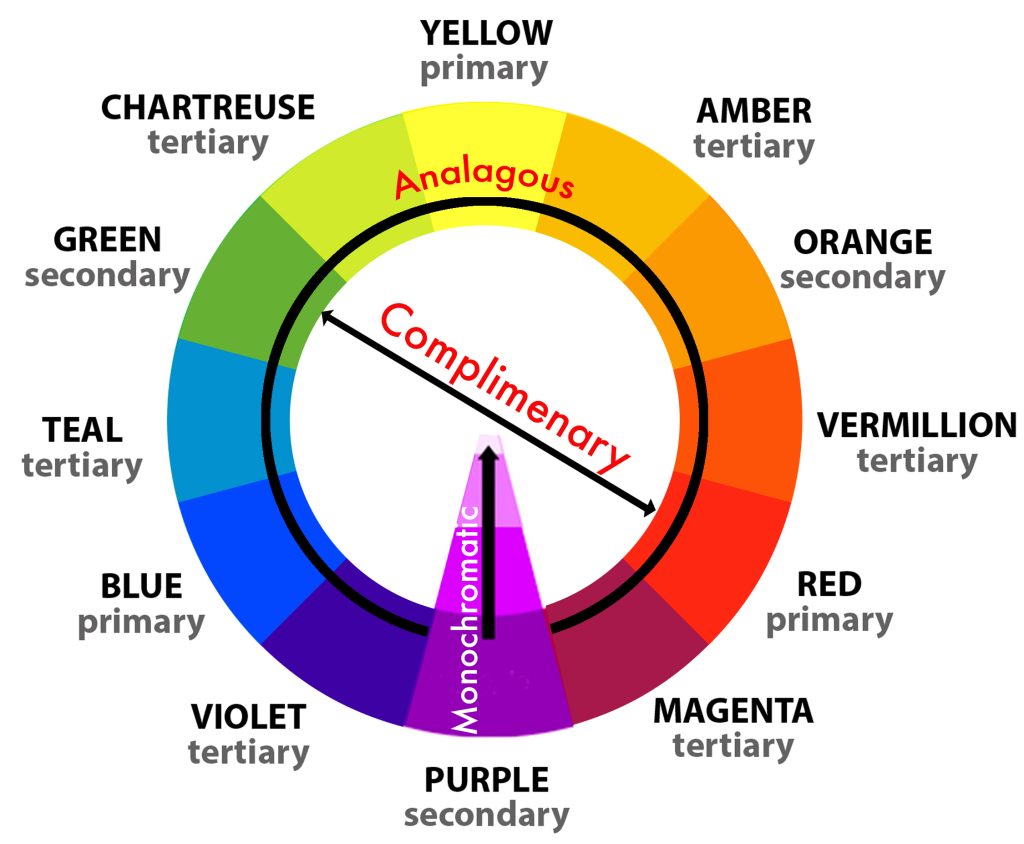
Analogous colors are groups of three colors (though it can be just two colors as well, but it creates less of a visual impact) that are next to each other on the color wheel. They usually match well and create serene and comfortable designs. In photography, analogous colors can create harmonious and pleasing compositions that evoke a specific mood or atmosphere.

  • Examples: Yellow, orange, and red; blue, green, and yellow.
  • Usage: Analogous colors are often found in nature and are great for creating a sense of harmony and unity in your images.

Complementary Colors

This is an example where intentionally using complementary colors made a significant impact. The beautiful old farmhouse was set against a vibrant green wheat field, but it needed a focal point. Knowing that red would complement the green and make the scene pop, I carefully positioned a red tricycle to complete the composition. As a side note, the photo was taken with the farm owner’s permission, and the tricycle was placed delicately to avoid disturbing the growing wheat. I always approach my photography with great care and respect for the subjects I capture. (This image was created using the HDR process) Photo by Eric Demattos CC BY-NC-SA (Attribution Non Commercial ShareAlike)

Complementary colors are pairs of colors that are opposite each other on the color wheel. When used together, they create a strong contrast and vibrant look. Complementary colors can make elements in your photographs stand out and draw attention to specific areas.

  • Examples: Red and green; blue and orange; yellow and purple.
  • Usage: Complementary colors are ideal for highlighting a subject and creating a striking visual impact. They are especially effective in compositions where you want to draw attention to a particular subject.

Monochromatic Colors

Converting this image to monochrome helped direct the viewer’s attention to the repeating elements of the boat ribs from an abandoned vessel, with an old bridge in the background. In the color version, the weeds and trees introduced colors that distracted from the textures and patterns I wanted to highlight. The black and white treatment simplifies the scene, allowing the structural details to stand out. This was also created using an HDR process which can be applied to color or monochromatic images. Photo by Eric Demattos CC BY-NC-SA (Attribution Non Commercial ShareAlike)

Monochromatic color schemes use variations in lightness and saturation of a single color. This approach can create a cohesive and elegant look, emphasizing texture and form over color variation. Black and white photography is on version of a monochromatic image. However it can be light and dark versions of any one color.

  • Examples: Different shades of blue; varying tints and tones of green.
  • Usage: Monochromatic colors are excellent for creating a unified, soothing composition. They can emphasize the texture, shape, and pattern of the subject.
This color wheel illustrates how complementary colors are positioned directly across from each other, analogous colors are adjacent to one another, and monochromatic colors consist of varying shades, and tones of a single hue. Illustration by Eric Demattos CC BY-NC-SA (Attribution Non Commercial ShareAlike)

Practical Exercises

Exercise 1: Complementary Colors

Objective: Capture a photograph that uses complementary colors to create a strong contrast and make the subject stand out.

Equipment Needed:

  • DSLR camera
  • A red apple and a green apple (or any other objects with complementary colors)

Steps:

  1. Find Your Location: Choose a well-lit area, either indoors or outdoors, where you can control the composition.
  2. Set Up Your Subject: Place the red apple next to the green apple. Ensure they are the main focus of your composition. Be mindful of the background, as colors can interfere with the complementary relationship. A white or black background works well and does not introduce incompatible colors.
  3. Compose Your Shot:
    • There are many compositions that could work for this shot. If you have only two objects in the image, consider putting one closer to the camera and one further to create a change in visual scale.
    • Ensure the background does not distract from the complementary color contrast.
  4. Adjust Your Camera Settings:
    • Use Aperture Priority mode (“A” or “Av”) to control depth of field.
    • Set a wide aperture (e.g., f/2.8 or f/4) to blur the background and emphasize the apples.
  5. Take the Shot: Capture several images from different angles and distances to explore how the complementary colors interact.
  6. Review and Adjust: Check the images on your LCD screen, ensuring the colors are vibrant and the contrast is clear. Adjust your settings or composition as needed.

Exercise 2: Analogous Colors

Objective: Capture a photograph that uses analogous colors to create a harmonious and pleasing composition.

Equipment Needed:

  • DSLR camera
  • A scenic location with a sunset (or another setting with analogous colors, such as a garden with various flowers)

Steps:

  1. Find Your Location: Choose a location where you can capture a sunset or another scene with analogous colors (e.g., yellow, orange, and red).
  2. Set Up Your Camera:
    • Switch to Aperture Priority mode (“A” or “Av”).
    • Set a mid-range aperture (e.g., f/8) to ensure both foreground and background are in focus.
  3. Compose Your Shot:
    • Be sure to consider composition in your image. One idea is to use the rule of thirds to place key elements in the frame.
    • Include elements that showcase the analogous colors, such as the sky, trees, or water reflecting the sunset.
  4. Adjust Your Camera Settings:
    • Set a low ISO (e.g., ISO 100 or 200) to reduce noise and capture clear details.
    • Adjust the white balance to emphasize the warm tones of the sunset, or use auto white balance for a neutral light tone.
  5. Take the Shot: Capture several images at different stages of the sunset to see how the colors change and interact.
  6. Review and Adjust: Check the images on your LCD screen, ensuring the colors are well-represented and the composition is harmonious. Adjust your settings or composition as needed.

Understanding White Balance

White balance is a camera setting that adjusts the colors to match the color of the light source so that white objects appear white in the photo. This is crucial for ensuring that the colors in your photographs are accurate and natural-looking. Different lighting conditions can produce various color casts, and adjusting the white balance helps correct these.

White Balance Options

  1. Auto White Balance (AWB): The camera automatically adjusts the white balance based on the lighting conditions. This is a convenient option for most situations, as it adapts to changing light.
  2. Daylight: Suitable for shooting in natural sunlight.
  3. Shade: Corrects the cooler tones in shaded areas, adding warmth to the image.
  4. Cloudy: Adds warmth to images taken under overcast skies.
  5. Tungsten: Compensates for the yellowish light of incandescent bulbs, making the image cooler.
  6. Fluorescent: Compensates for the greenish light of fluorescent bulbs, making the image warmer.
  7. Flash: Used when using the camera’s built-in flash or an external flash, providing a neutral light balance.
  8. Custom: Allows you to manually set the white balance by photographing a white or gray reference object under the lighting conditions you’ll be shooting in.

Creative Use of White Balance

This silhouette was created by positioning a bright light behind the subject in a darkened room. The camera’s white balance was deliberately set to tungsten, instead of daylight, to introduce a cool blue cast. This effect was further enhanced in Photoshop to evoke the feeling of an overcast day. Photo by Eric Demattos CC BY-NC-SA (Attribution Non Commercial ShareAlike)

Experimenting with different white balance settings can produce creative effects and unique tones in your images. For instance, using the tungsten white balance setting in natural daylight can give your photos a cool, bluish cast, which can be used creatively to evoke a particular mood.

Correcting Color Casts

White balance can also be used to correct unwanted color casts that occur under various lighting conditions. For example, indoor lighting often has a yellow or green cast, which can be neutralized by selecting the appropriate white balance setting (such as tungsten for incandescent lights or fluorescent for fluorescent lights).

Exercise: Experimenting with White Balance

Objective: Explore the creative effects of different white balance settings and learn to correct color casts.

Equipment Needed:

  • DSLR camera
  • Various lighting environments (e.g., daylight, tungsten, fluorescent)

Steps:

  1. Find Your Location: Choose different lighting environments to experiment with.
  2. Set Your Camera: Switch to manual white balance settings.
  3. Take Shots with Different Settings:
    • Capture images using different white balance presets (daylight, shade, cloudy, tungsten, fluorescent).
    • Note the changes in color and mood for each setting.
  4. Experiment with Creative Effects:
    • Try using the tungsten setting in natural daylight to see the cool, bluish effect.
    • Use the cloudy or shade setting in midday sunlight to add warmth to your images.
  5. Correct Color Casts:
    • Identify any unwanted color casts in your images.
    • Adjust the white balance to correct these casts and achieve a natural look.
  6. Review and Adjust: Review your images and adjust the white balance settings as needed to achieve the desired effect.

Tips for Success

  • Experiment with Different Times of Day: Lighting conditions can significantly impact how colors appear. Experiment with shooting at different times of day to see how it affects your color relationships.
  • Use Post-Processing Tools: Use photo editing software to enhance the colors and contrast in your images. This can help you achieve the desired effect and make your colors pop.
  • Observe and Learn from Others: Study the work of other photographers to see how they use color in their compositions. This can provide inspiration and help you develop your own style.

By understanding and applying color theory and mastering white balance, you can create more dynamic, visually appealing images. Practicing these exercises will help you develop a keen eye for color and improve your ability to use color effectively in your compositions.

I was drawn to the complementary colors of red and green in this scene, with subtle hints of blue and yellow in the parrot’s feathers. In nature, we rarely find isolated, perfect colors that align exactly with our intended color relationships, but even when they dominate the image, they create stunning contrasts. Photo by Eric Demattos CC BY-NC-SA (Attribution Non Commercial ShareAlike)


License

Icon for the Creative Commons Attribution-NonCommercial-ShareAlike 4.0 International License

Learning Digital Photography Copyright © by Eric Demattos is licensed under a Creative Commons Attribution-NonCommercial-ShareAlike 4.0 International License, except where otherwise noted.

Share This Book