1 Understanding Your Camera

Getting Started with Your Equipment

This is a collection of vintage cameras from my office. While modern phone cameras and DSLRs may seem vastly different from these classics, the fundamental elements of creating an image—shutter speed, aperture, and ISO—have remained remarkably consistent over time. Photo by Eric Demattos CC BY-NC-SA (Attribution Non Commercial ShareAlike)

Chapter 1: Getting Started with Your Equipment

Introduction to Equipment

Welcome to your journey into the world of photography! Before diving into taking breathtaking shots, it’s essential to familiarize yourself with the tools of the trade. In this chapter, we will explore the various types of cameras, understand the anatomy of a DSLR, learn how to hold your camera properly, and delve into the vital accessories that can enhance your photography. Each camera will have some slight differences in functions and buttons to access those functions so be sure to have your own camera instruction manual to reference while you read this chapter.
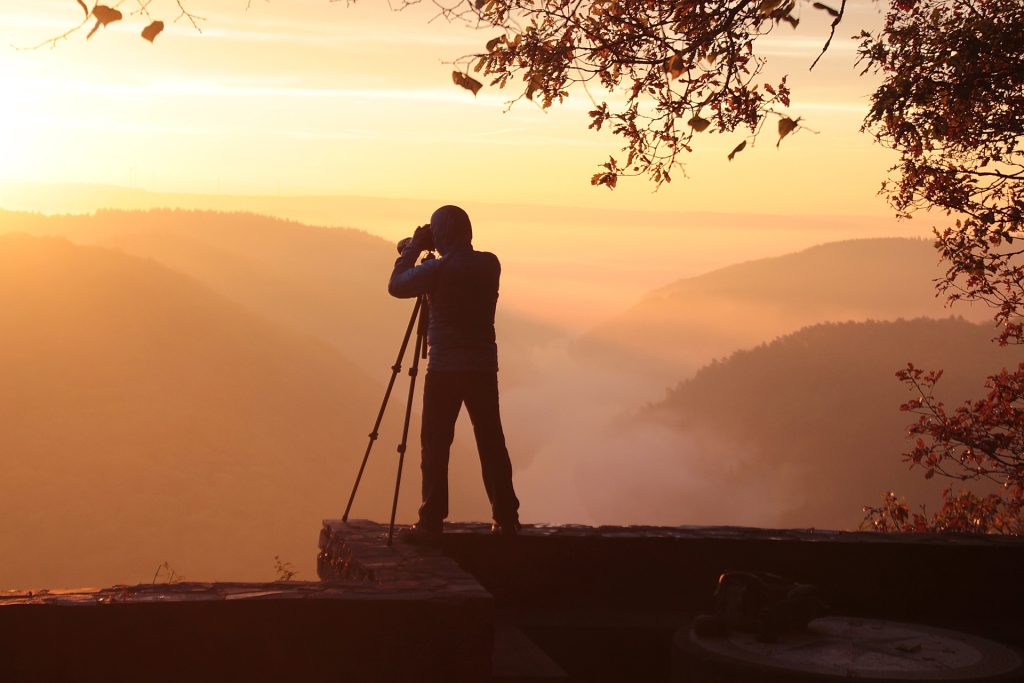
A few essential items that will serve any photographer well include a camera, tripod, filters, cleaning cloths, extra batteries, a camera strap, a flash, memory cards, various lenses, and a durable camera bag to protect your gear. Image by Lucio Alfonsi from Pixabay.

Explaining Cameras

Cameras come in many shapes and sizes, each suited to different needs and preferences. The main types include:

  • Compact Cameras: Also known as point-and-shoot cameras, these are user-friendly, lightweight, and ideal for casual photography.
  • Bridge Cameras: These cameras offer more advanced features than compact cameras and often include a powerful zoom lens.
  • Mirrorless Cameras: Compact and versatile, mirrorless cameras provide excellent image quality and interchangeable lenses without the bulk of a DSLR.
  • DSLR Cameras: Digital Single-Lens Reflex cameras and mirrorless cameras are the go-to choice for professional photographers and enthusiasts. They offer superior image quality, interchangeable lenses, and extensive manual controls.

Anatomy of a DSLR

Understanding the anatomy of a DSLR is crucial for making the most of its features. Here are the key components:
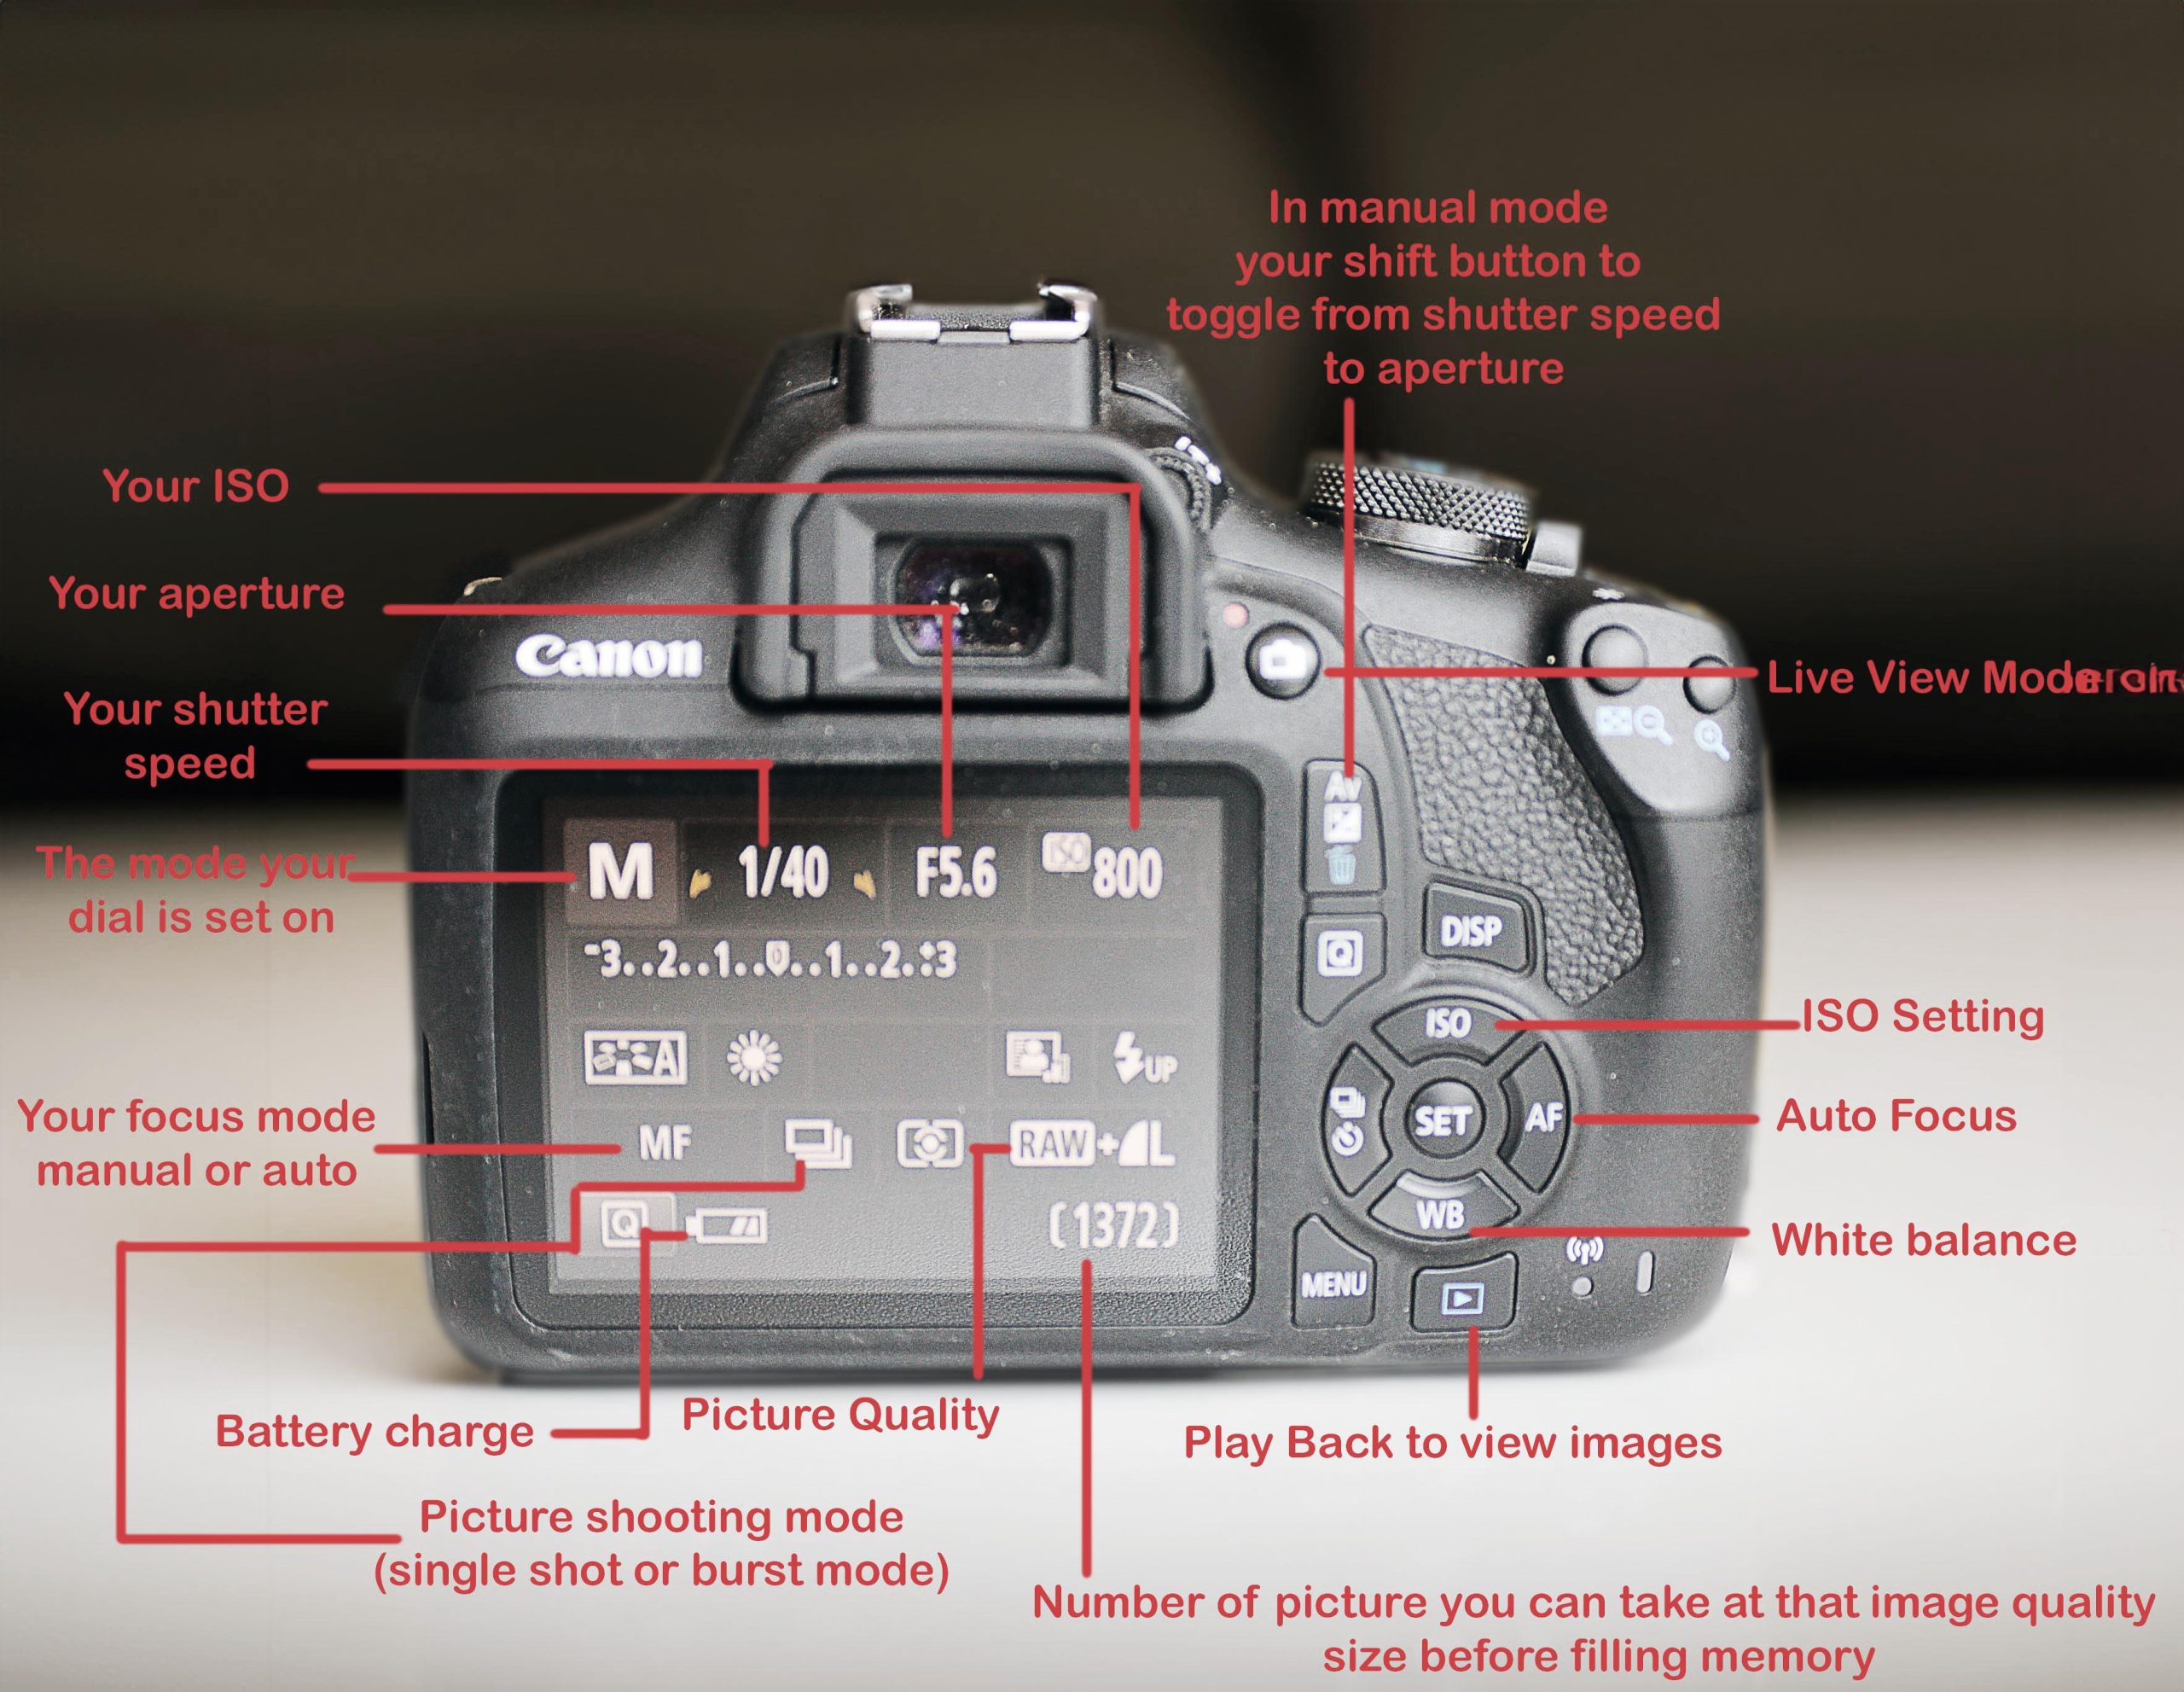
Here are descriptions of the buttons and screen icons and what they represent. While different camera brands may display this information differently, the essential details are usually consistent. This example is from a Canon Rebel T7. Refer to your camera manual to locate and understand these features on your specific device. Photo by Eric Demattos CC BY-NC-SA (Attribution Non Commercial ShareAlike)
  • Body: The main part of the camera, housing the sensor and controls.
  • Lens: Interchangeable lenses allow for different focal lengths and creative effects.
  • Viewfinder: A small window you look through to compose your shot. DSLRs use an optical viewfinder, giving a direct optical preview of the scene.
  • LCD Screen: Used for reviewing images, navigating menus, and composing shots in live view mode.
  • Mode Dial: Allows you to select different shooting modes, such as manual, aperture priority, and shutter priority.
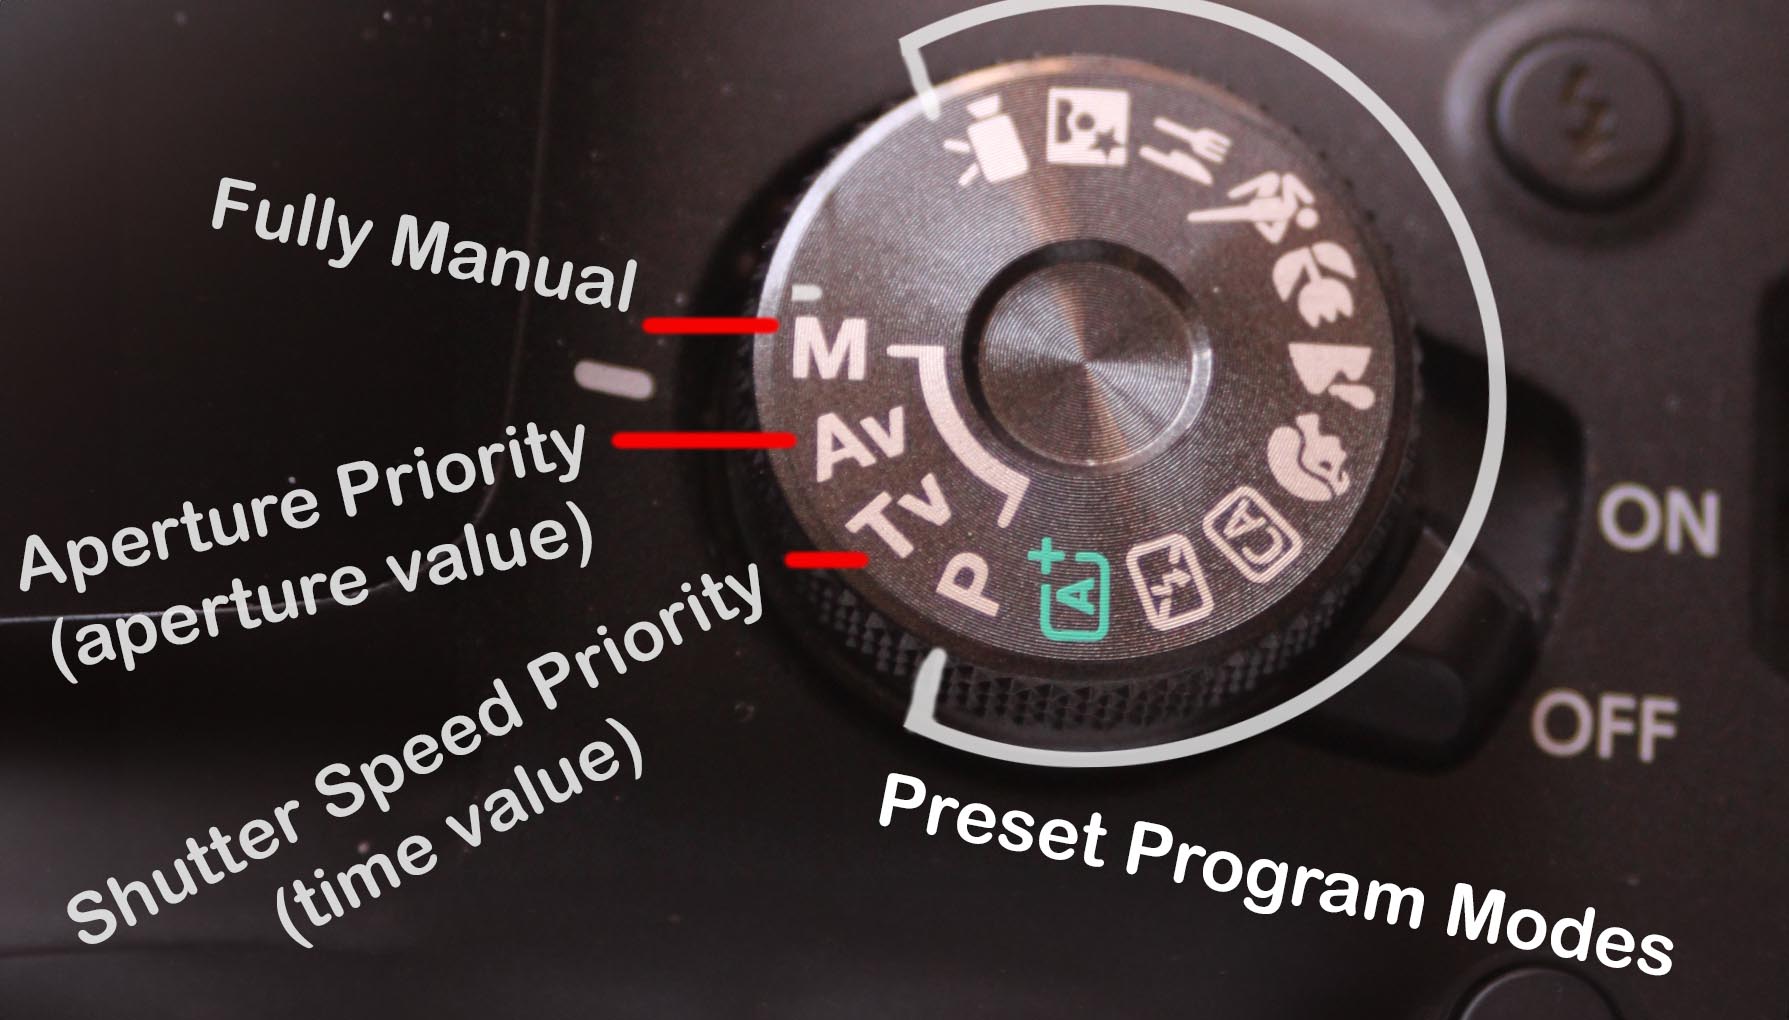
The mode dial, usually found on the top of the camera, is a crucial feature. In this course, we’ll focus on three specific modes: Manual, Aperture Priority, and Shutter Priority, as highlighted in the image. The remaining icons represent preset program modes, which we will not be using as they limit creative control. Our focus here is on mastering the fundamentals of photography. Photo by Eric Demattos CC BY-NC-SA (Attribution Non Commercial ShareAlike)
  • Shutter Button: Pressed to take a picture.
  • Control Dials: Used to adjust settings like aperture, shutter speed, and ISO.
  • Memory Card Slot: Where your memory card is inserted to store images.
  • Battery Compartment: Houses the battery that powers your camera.
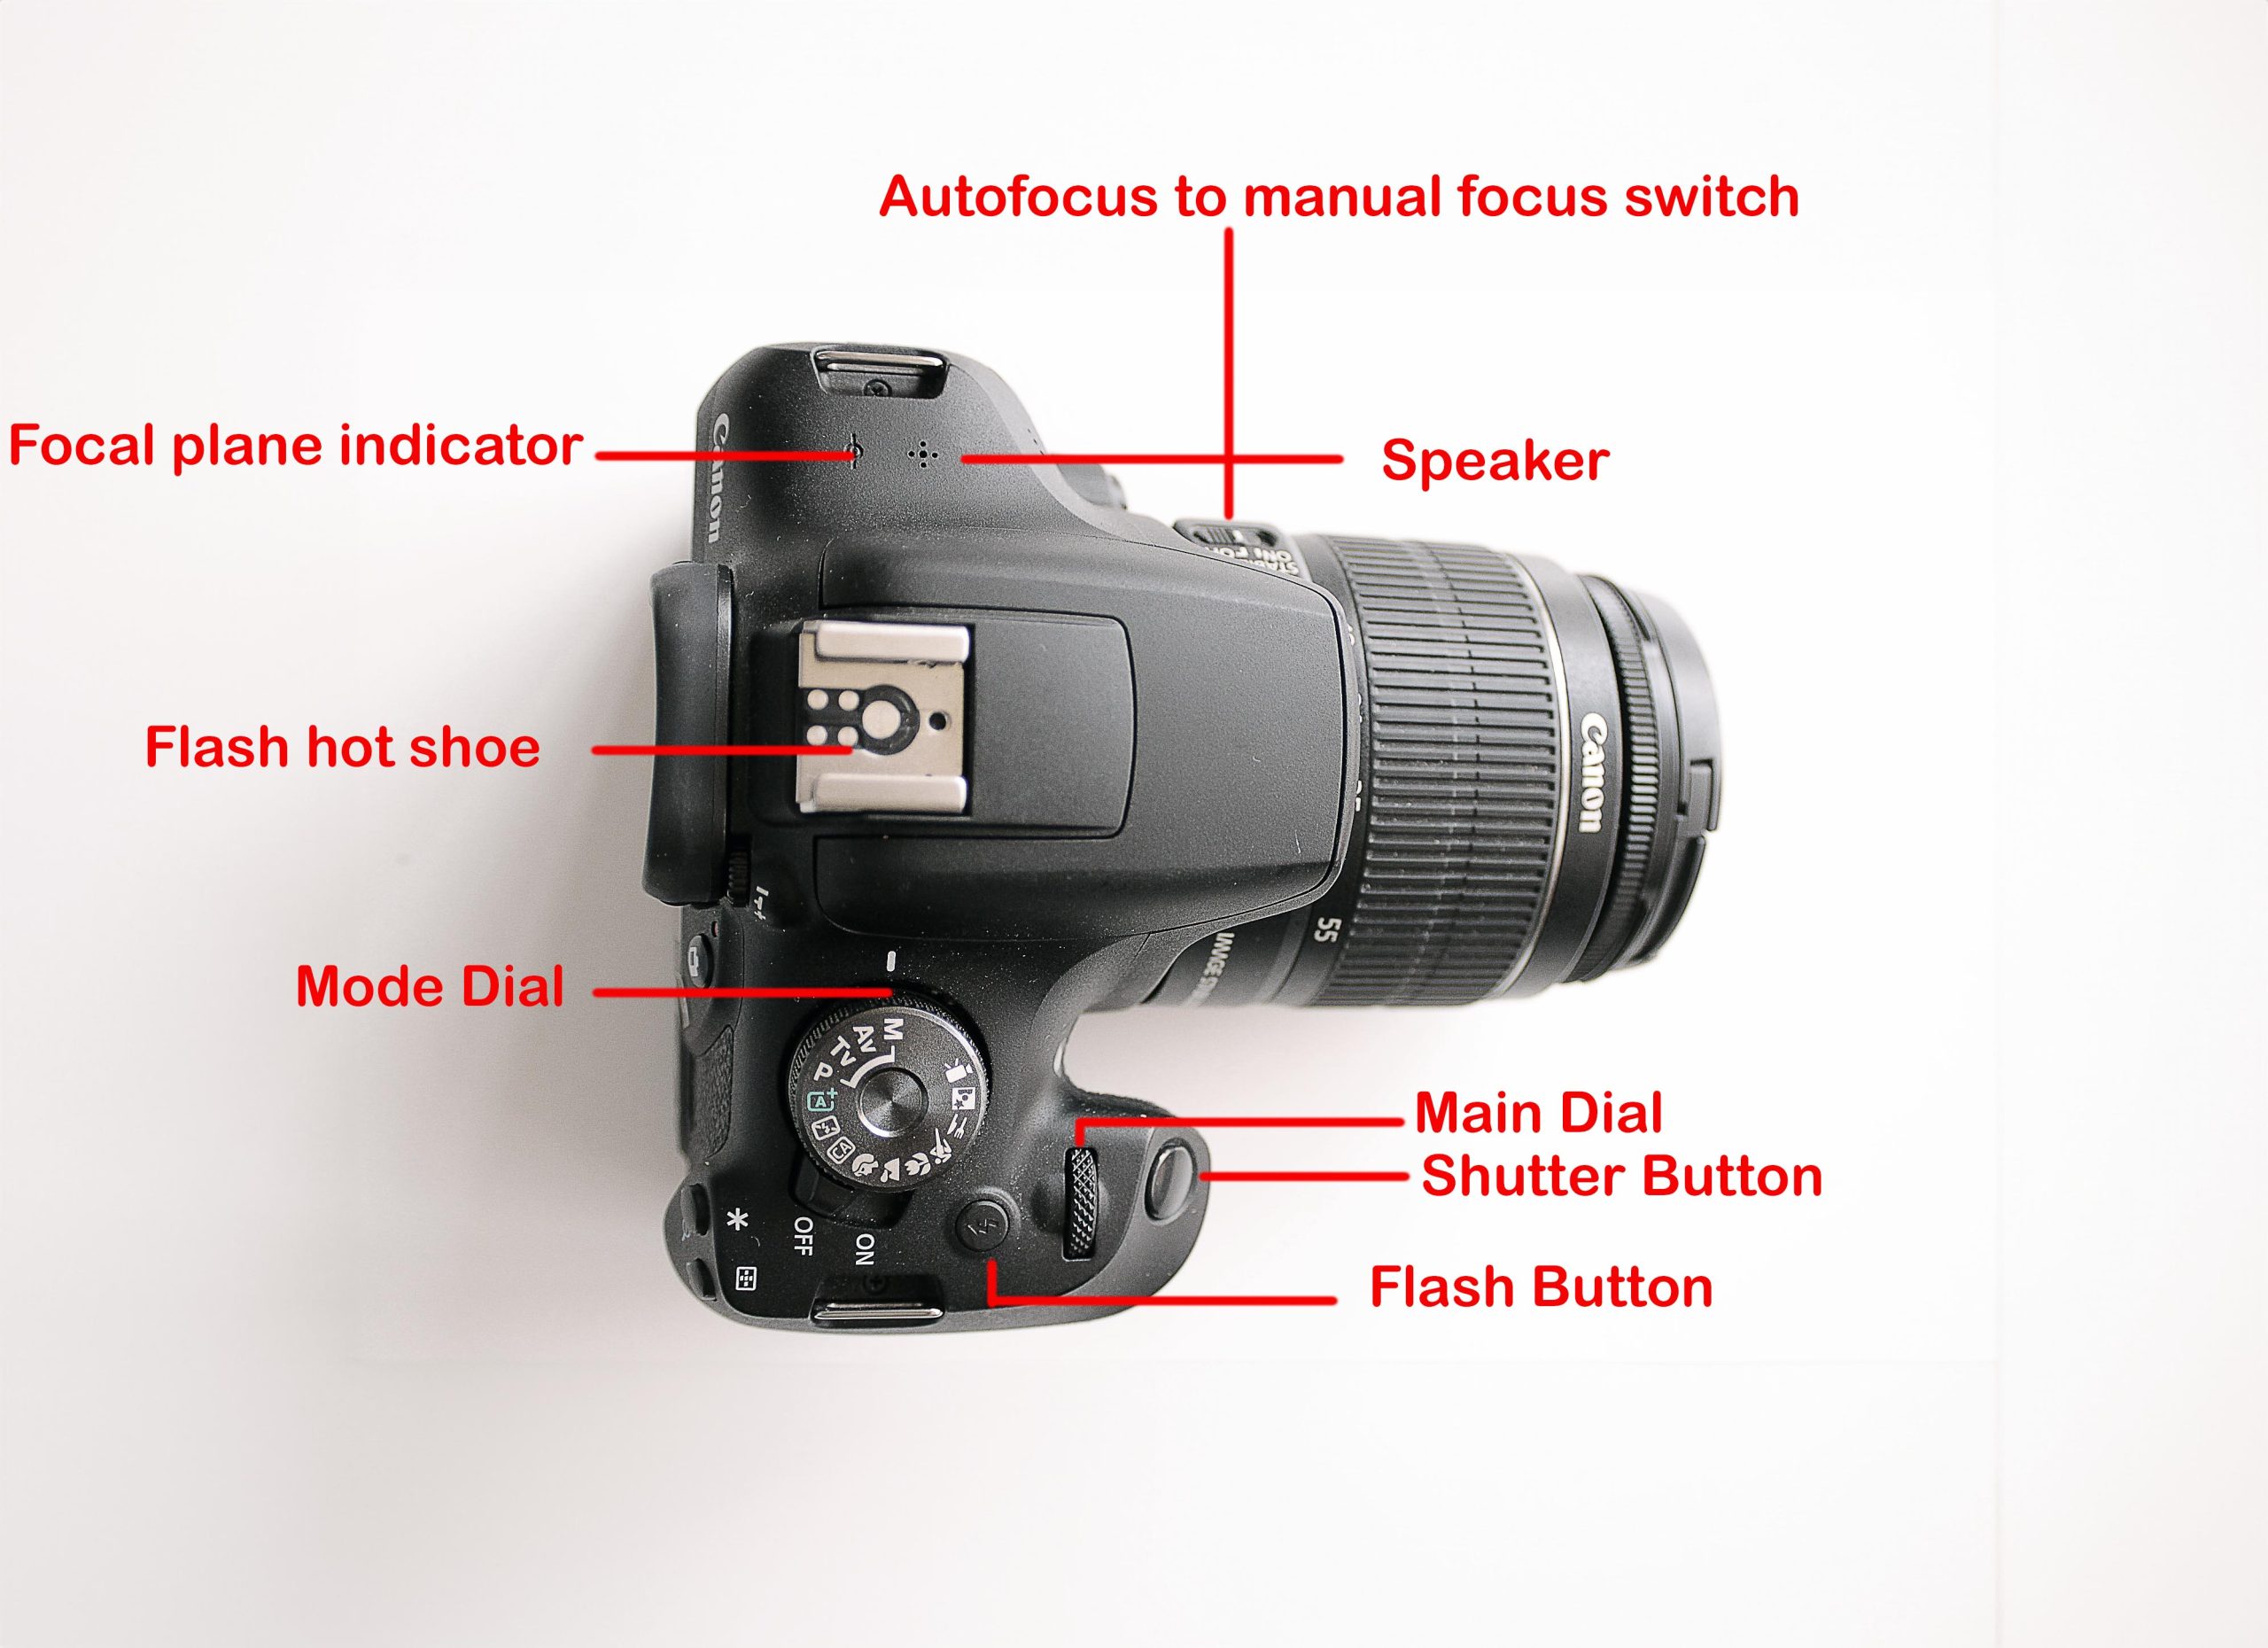
Although camera brands and models vary, many control features remain consistent across different devices. Below are some of the key controls from a Canon Rebel T7. Refer to your camera manual to locate and understand these functions on your specific model. Photo by Eric Demattos CC BY-NC-SA (Attribution Non Commercial ShareAlike)

Holding Your Camera

Properly holding your camera can significantly impact the sharpness of your images. Here’s how to do it:

  1. Grip the Camera: Use your dominant hand to hold the camera body, keeping your index finger on the shutter button.
  2. Support the Lens: Use your other hand to support the lens, cradling it from underneath.
  3. Elbows In: Keep your elbows close to your body to minimize movement.
  4. Stance: Stand with your feet shoulder-width apart for stability.
  5. Breathing: Take a deep breath and exhale slowly before pressing the shutter button to reduce camera shake.
    Be sure to support your lens with one hand, which can also work to turn the zoom or focus rings while griping the body of the camera with the other hand so that your finger can operate the shutter release button. Image by Danil Akramov from Pixabay

Camera Accessories

Accessories can enhance your photography by providing additional functionality and improving the quality of your images. Let’s explore some essential accessories:

Lenses

Lenses can greatly enhance your photography experience. Specialized lenses, such as wide-angle lenses, allow you to capture expansive views of your surroundings, while zoom lenses bring distant subjects closer. There are many variations in between, each suited to different needs. Depending on your preferred type of photography, investing in a specialized lens can be a worthwhile option. AI generated image

Different lenses serve different purposes. Here are some common types:

  • Prime Lenses: Fixed focal length lenses known for their sharpness and wide apertures.
  • Zoom Lenses: Versatile lenses that cover a range of focal lengths.
  • Wide-Angle Lenses: Ideal for landscape photography, offering a broader field of view.
  • Telephoto Lenses: Great for wildlife and sports photography, allowing you to zoom in on distant subjects.
  • Macro Lenses: Perfect for close-up photography, capturing intricate details of small subjects.

Tripods

A tripod is an essential accessory for achieving sharp images, especially in low light conditions or when using slow shutter speeds. Key features to consider when choosing a tripod include stability, weight, and height.

Lighting

Lighting is crucial in photography. Here are some common lighting accessories:

  • External Flash: Provides additional light and can be used off-camera for creative effects.
  • Reflectors: Bounce natural or artificial light onto your subject to reduce shadows.
  • Softboxes and Umbrellas: Diffuse light to create a softer, more flattering effect.

Additional Accessories

  • Camera Bag: Protects your gear and makes it easier to transport.
  • Remote Shutter Release: Allows you to trigger the camera without touching it, reducing the risk of camera shake. Many newer cameras come with an app to link to your phone that gives you remote options.
  • Filters: Enhance your images with effects such as polarizing or neutral density filters.
  • Extra Batteries and Memory Cards: Ensure you have enough power and storage for extended shoots.

Image Formats: JPEG vs RAW

Understanding image formats is crucial for post-processing and achieving the desired quality in your photographs. The two most common formats are JPEG and RAW.

JPEG

  • Compression: JPEG files are compressed, which reduces file size but also results in some loss of image quality.
  • Convenience: JPEGs are widely supported and ready to use straight out of the camera.
  • Editing: Limited flexibility in post-processing due to the compressed nature of the file.

RAW

  • Quality: RAW files contain all the data captured by the camera’s sensor, offering the highest quality.
  • Flexibility: Provides greater flexibility in post-processing, allowing you to adjust exposure, white balance, and other settings without degrading the image quality.
  • File Size: RAW files are significantly larger than JPEGs, requiring more storage space.

By understanding your equipment, knowing how to use your camera, and choosing the right accessories, you’ll be well on your way to capturing stunning photographs. Embrace the learning process, and don’t hesitate to experiment with different tools and techniques. Once you understand the mechanics of how your camera operates and where controls are located it’s time to understand how these settings work together to create your images, the first thing to understand is something called the exposure triangle.

Understanding the Exposure Triangle

The exposure triangle is a fundamental concept in photography that helps you understand how to control the amount of light entering your camera to create a correctly exposed image. The three elements of the exposure triangle—shutter speed, aperture, and ISO—work together to determine exposure. Mastering this concept will give you the creative control needed to capture stunning photographs in any lighting condition.

This infographic is a derivative of servals sources combined and modified by Eric Demattos CC BY-NC-SA (Attribution Non Commercial ShareAlike)

In the following chapters, we will explore each of these functions independently and examine how they can be used for both practical applications (achieving the desired exposure) and creative applications (such as creating intentional blur or grain). Before diving into each element individually, it’s helpful to have an overview of how they function together.

Shutter Speed

The shutter in a DSLR camera is a mechanical component that controls the exposure by opening and closing to allow light to hit the camera sensor. When the shutter button is pressed, the blades rapidly move to expose the sensor for a predetermined amount of time, capturing the image. The shutter speed, which can range from fractions of a second to several seconds, directly influences the amount of light and motion captured in the photograph. Photo by Dinkun Chen CC BY-SA

Shutter speed refers to the length of time the camera’s shutter is open, allowing light to hit the sensor. It is measured in fractions of a second (e.g., 1/1000s, 1/250s, 1/30s) or whole seconds (e.g., 1s, 10s).

  • Fast Shutter Speeds: Freeze motion, capturing sharp images of moving subjects. Ideal for sports and action photography.
  • Slow Shutter Speeds: Blur motion, creating a sense of movement. Perfect for capturing light trails or smooth water effects.

Aperture

This illustration shows the camera aperture, a mechanical component inside the lens, consisting of overlapping blades that adjust to control the amount of light reaching the camera sensor. The partially closed aperture reveals its polygonal shape, which changes depending on the degree of opening. Aperture size not only influences exposure but also affects depth of field, playing a crucial role in determining how much of the image appears in focus. AI generated illustration

Aperture is the size of the opening in the lens through which light enters the camera. It is measured in f-stops (e.g., f/2.8, f/5.6, f/11).

  • Wide Aperture (Low f-stop number): Lets in more light, resulting in a shallow depth of field. Great for portraits where you want the background to be blurred.
  • Narrow Aperture (High f-stop number): Lets in less light, creating a deeper depth of field. Useful for landscapes where you want everything in focus from foreground to background.

ISO

ISO measures the sensitivity of your camera’s sensor to light. It is represented by numbers such as ISO 100, ISO 400, ISO 1600.

  • Low ISO: Less sensitive to light, produces less noise, and results in cleaner images. Ideal for bright conditions.
  • High ISO: More sensitive to light, allows shooting in low light conditions but increases noise, which can reduce image quality.

How the Exposure Triangle Works Together

To achieve a correctly exposed image, you need to balance the shutter speed, aperture, and ISO. Changing one element affects the others, and understanding their relationship is key to mastering exposure.

  • Shutter Speed and Aperture: If you decrease the shutter speed (e.g., from 1/1000s to 1/500s) to let in more light, you may need to use a narrower aperture (higher f-stop) to prevent overexposure. Conversely, if you use a fast shutter speed to freeze motion, you might need a wider aperture to allow enough light in.
  • Shutter Speed and ISO: In low light situations, you can increase the ISO to allow for a faster shutter speed, which helps to avoid motion blur. For example, if you set a fast shutter speed (e.g., 1/1000s) in dim lighting, you might need to increase the ISO to 1600 or higher to achieve the correct exposure.
  • Aperture and ISO: When shooting with a narrow aperture (e.g., f/16) to maximize depth of field, you might need to increase the ISO to maintain a proper exposure without slowing down the shutter speed too much. This is particularly useful in low light conditions.
Think of Aperture, Shutter Speed, and ISO as the three legs of a stool—each one essential to creating a well-exposed image. And that fourth leg you might be wondering about? Well, it doesn’t need to be there, but if it were, it would represent light itself—the one factor outside the camera that’s just as crucial to achieving the perfect exposure. Without light, the other three can’t do their job. Image by Eric Demattos CC BY-NC-SA (Attribution Non Commercial ShareAlike)

Practical Example

Imagine you are photographing a fast-moving subject in low light. You want to freeze the action without introducing too much noise or blurring. Here’s how you could balance the exposure triangle:

  1. Set a Fast Shutter Speed: Choose a shutter speed of 1/1000s to freeze the motion.
  2. Adjust the Aperture: Use a wide aperture, such as f/2.8, to allow more light into the camera.
  3. Increase the ISO: Set the ISO to 1600 or higher to compensate for the reduced light due to the fast shutter speed and narrower depth of field.

By understanding and manipulating these three elements, you can achieve the desired exposure while maintaining creative control over the final image.

License

Icon for the Creative Commons Attribution-NonCommercial-ShareAlike 4.0 International License

Learning Digital Photography Copyright © by Eric Demattos is licensed under a Creative Commons Attribution-NonCommercial-ShareAlike 4.0 International License, except where otherwise noted.

Share This Book