5 Shutter Speed

Chapter 2: Mastering Shutter Priority Mode: Controlling Motion
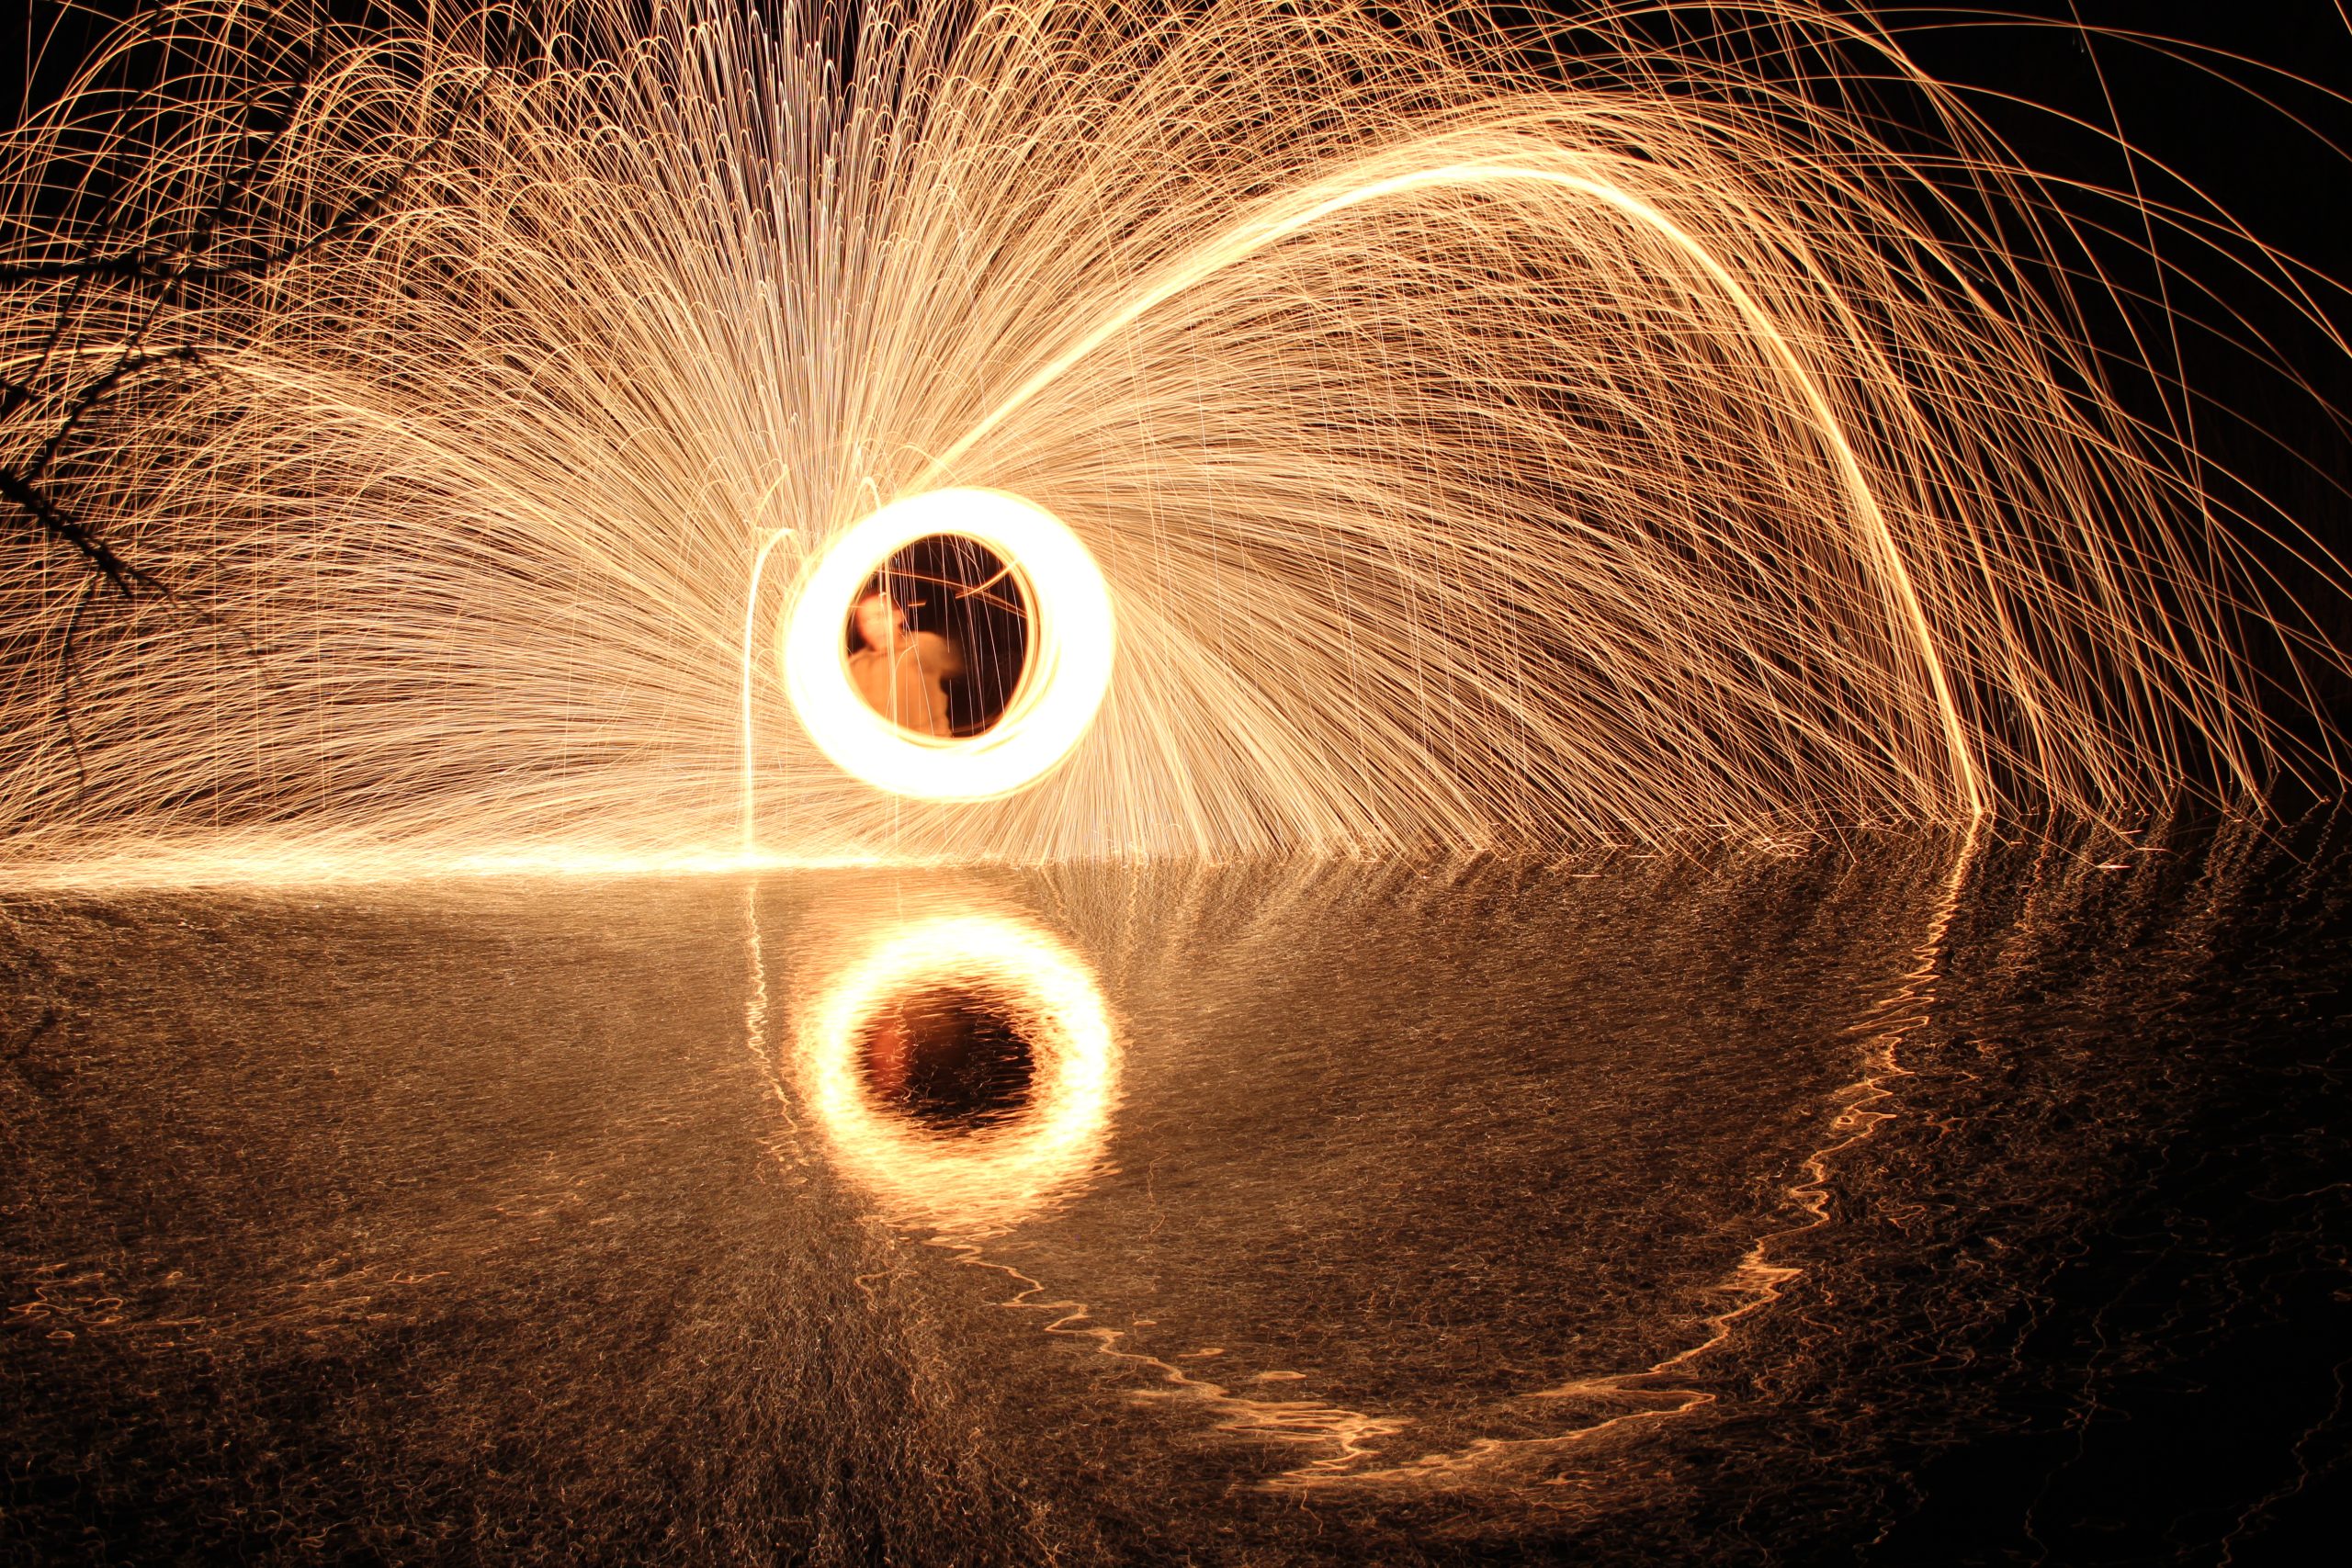
Using a 30-second shutter speed, this image captures light trails created by spinning fine steel wool, ignited and placed inside a whisk attached to a chain. The steel wool is spun in a circle, creating striking patterns of light. For safety, this was performed over water. Important: Always research proper safety precautions and check local regulations before attempting this technique. Photo by Eric Demattos CC BY-NC-SA (Attribution Non Commercial ShareAlike)

Shutter Priority mode, often abbreviated as “S” or “Tv” (Time Value) on your DSLR’s mode dial, is a powerful tool that allows you to take control of your camera’s shutter speed. This mode is particularly useful for capturing motion, whether you want to freeze fast action or create smooth, flowing effects. Let’s delve into how Shutter Priority mode works and how you can make the most of it.

Understanding Shutter Speed

Before we explore Shutter Priority mode, it’s essential to understand what shutter speed is. Shutter speed refers to the length of time your camera’s sensor is exposed to light. It is measured in seconds or fractions of a second (e.g., 1/1000s, 1/250s, 1/30s, 1s). A fast shutter speed (like 1/1000s) can freeze action, while a slow shutter speed (like 1s) can blur moving subjects, creating a sense of motion.

How Shutter Priority Mode Works

In Shutter Priority mode, you select the shutter speed, and the camera automatically adjusts the aperture to achieve a correct exposure. This semi-automatic mode is ideal for situations where controlling motion is more important than controlling depth of field. Here’s how to use Shutter Priority mode effectively:

  1. Set Your Mode Dial: Turn the mode dial on your DSLR to “S” or “Tv”.
  2. Select Your Shutter Speed: Use the control dial to choose the desired shutter speed. For fast-moving subjects, select a high shutter speed (e.g., 1/500s or faster). For creative motion blur, choose a slower shutter speed (e.g., 1/30s or slower).
  3. Check the Aperture: The camera will automatically select the appropriate aperture to match your chosen shutter speed. Keep an eye on the aperture value displayed in the viewfinder or on the LCD screen.
  4. Adjust ISO Sensitivity: If the lighting conditions are challenging, you may need to adjust the ISO setting to ensure a proper exposure. A higher ISO can help in low light, but be mindful of the increased noise.
  5. Take Your Shot: Compose your image, focus, and press the shutter button to capture the moment.

Practical Applications

Freezing Action

When photographing sports, wildlife, or other fast-moving subjects, use a high shutter speed to freeze the action. For example, to capture a bird in flight or a child running, set your shutter speed to 1/1000s or higher.

Exercise: Freezing Motion with Fast Shutter Speeds

Objective: Capture a sharp, well-exposed image of a person jumping, freezing the motion in mid-air.

Author jumping in mid air
This image was captured with a 1/1000-second shutter speed, perfectly freezing the moment as I jumped off a low bench. Student Photo in Eric Demattos class CC BY-NC-SA (Attribution Non Commercial ShareAlike)

Steps:

  1. Find Your Location: Choose an open area with plenty of natural light. A park or a sports field works well.
  2. Set Up Your Camera:
    • Switch to Shutter Priority mode (S or Tv).
    • Set your shutter speed to 1/500s or faster. Start with 1/1000s if the lighting allows.
    • Set your ISO to a low setting, such as ISO 100 or 200. Increase the ISO only if the images are too dark.
  3. Prepare Your Subject:
    • Ask your friend to perform a jump, such as a leap or a jump with raised arms.
    • Position yourself at a distance where you can capture the entire jump within the frame.
  4. Compose Your Shot:
    • Frame the shot to include the entire jump, leaving some space above and below the jumper.
    • Use continuous autofocus (AF-C) mode to keep your friend in focus throughout the jump.
  5. Take the Shot:
    • Focus on your friend before they jump.
    • Ask them to jump on your count (e.g., “1, 2, 3, jump!”).
    • Press and hold the shutter button just before they jump to capture a series of shots.
  6. Review and Adjust:
    • Check your images on the LCD screen.
    • Ensure the motion is frozen and the subject is sharp.
    • If the images are blurry, increase the shutter speed or improve focus.

Tips for Success:

  • Shoot in Burst Mode: Use your camera’s burst mode to capture a series of images in quick succession. This increases your chances of getting the perfect shot.
  • Experiment with Angles: Try shooting from different angles to add variety and interest to your images.
  • Check Your Background: Ensure the background is not too busy or distracting, as this can take attention away from the subject.

Creating Motion Blur

To convey motion in your images, such as flowing water or moving traffic, use a slower shutter speed. A setting of 1/30s to 1s can create beautiful blur effects, but remember to use a tripod to keep the rest of the scene sharp.

Exercise: Creating Motion Blur with Moving Lights

Objective: Capture the light trails of moving vehicles using a slow shutter speed.

I set up the camera on a tripod with a 30-second shutter speed. When I pressed the shutter, the camera captured the bright light trails of a passing car, while the car itself remained unexposed. The result is a striking image of light trails against the backdrop of the tunnel, which began to expose before the car passed by. Photo by Eric Demattos CC BY-NC-SA (Attribution Non Commercial ShareAlike)

Steps:

  1. Find Your Location: Choose a spot with a good view of a busy street, highway, or cityscape. Make sure you’re safe and not obstructing any pathways.
  2. Set Up Your Camera:
    • Mount your camera on the tripod and ensure it’s stable.
    • Switch to Shutter Priority mode (S or Tv).
    • Set the shutter speed to 10 seconds. This is a good starting point for capturing light trails.
  3. Adjust Your Settings:
    • Set your ISO to 100 or 200 to keep noise low.
    • Let the camera choose the aperture, but check that it’s not too wide (below f/4), as this can result in overexposure.
  4. Compose Your Shot:
    • Frame the scene to include both static elements (like buildings, street signs, or trees) and the path of the moving lights.
    • Use live view if available to fine-tune your composition.
  5. Take the Shot:
    • Press the shutter button or use a remote release to start the exposure.
    • Wait for the exposure to complete (10 seconds in this case).
  6. Review and Adjust:
    • Check your image on the LCD screen.
    • If the light trails are too short, try increasing the shutter speed to 15 or 20 seconds.
    • If the image is too bright, lower the ISO or wait until the scene is darker.

Tips for Success:

  • Experiment with Different Shutter Speeds: Try various shutter speeds to see how they affect the length and intensity of the light trails.
  • Shoot in Manual Focus: Autofocus can struggle in low light. Switch to manual focus and focus on a distant light or building.
  • Bracket Your Exposures: Take multiple shots at different shutter speeds to ensure you get the perfect shot.

Tips for Using Shutter Priority Mode

Bell pepper splashing in water
In this shot, the camera was set to 1/1000 of a second to capture the moment a bell pepper was dropped into a water-filled fish tank. The dark, shadowed background contrasts with the illuminated water droplets, highlighting the splash. The bell pepper’s color was later adjusted in Photoshop to achieve a vibrant purple hue. Photo by Eric Demattos CC BY-NC-SA (Attribution Non Commercial ShareAlike)
  • Experiment with Different Speeds: Don’t be afraid to try various shutter speeds to see how they affect your photos. This experimentation will help you understand the balance between motion and exposure.
  • Use a Tripod: For slower shutter speeds, especially below 1/60s, a tripod is essential to prevent camera shake and maintain sharpness in static parts of the image.
  • Monitor Exposure: Keep an eye on the exposure meter to ensure your image is not under or overexposed. Adjust the ISO or exposure compensation if necessary.
This collection showcases student work from my classroom, where we practiced slow shutter speeds of 20-30 seconds. It highlights the creative possibilities of using colored lights, a tripod-mounted camera, and, in some cases, two people—one standing still while the other moves the light behind them. Photo compilation by Eric Demattos, various images from students CC BY-NC-SA (Attribution Non Commercial ShareAlike)

Conclusion

By mastering Shutter Priority mode, you can take control of how motion is depicted in your photographs, adding a dynamic and creative element to your images. Whether you’re freezing a moment in time or creating a sense of movement, this mode provides the flexibility to capture the world in motion, just the way you envision it. From freezing the action in sports to creating artistic light trails at night, mastering shutter speed will enhance your photographic skills and expand your creative possibilities.

License

Icon for the Creative Commons Attribution-NonCommercial-ShareAlike 4.0 International License

Learning Digital Photography Copyright © by Eric Demattos is licensed under a Creative Commons Attribution-NonCommercial-ShareAlike 4.0 International License, except where otherwise noted.

Share This Book